OpenSplice DDS is a high-performance messaging technology, and DDS stands for Data Distribution Service for Real-Time Systems (DDS). To be honest i dont know much actually i know very little at all. It seems to be a middleware (a data bus) that is supposed to make your applications to communicate. I had been involved in an m2m project for automatic meter reading (AMR) in the past. The protocol we used was MQTT based. MQTT was easy to understand easy to use and a pleasure to work with however my experience with dds so far not so pleasant it is not easy to understand not easy to use and not pleasant to work with (my personal opinions these are free to not to agree you are). DDS promises a de-centralized structure compared to one server multiple client approach. Anyway the compile steps for open splice is described step by step at the opensplice web site but there is a catch which is not documented you need to have MPC (Make Project Creator) installed and you need MPC_ROOT environment variable set properly (pointing to directory where you installed MPC). Und you should not be using the MPC from its official web site you need to download modified MPC from PrismTech source repo at git hub. which is A fork of OCI's MakeProjectCreator with some tweaks required to support working with OpenSplice and this piece of information is not documented anywhere (at least not anywhere i can find they should have listed these requirement on their web site again this is my opinion free you are to not to agree) not using the proper MPC causes opensplice compile to fail und lots of headaches. hope someone finds this info valuable and saves some time trying to compile the code.
Thursday, October 2, 2014
Monday, March 10, 2014
Bash Script To Monitor Your Web App
Assume you have a web application deployed on some Linux Server(s) and you want to get an email notification if for some reason your web app went down and stopped providing service. The most straightforward and easy way is to create a cronjob on the server to poll the service status using a HTTP client (wget). Recently we run into this kind of need and created a very simple (and crude and primitive and pathetic) bash script to poll an URL on periodic intervals and based on the http response send an email to the defined mail distribution list to inform people about service status. You can find the bash script below. I need to admit it is very primitive but yet its working for us so far. (Except the flooding of the emails when the server is down)
1.) ssh to your server and open "vim" paste below script and save it with some name.
#!/bin/bash
MAIL_LIST="xx.yy@cc.com aa@bb.tt ll@bb.cc.com"
APPLICATION_URL=http://xxx.yy.zz.tt:8080/core
wget -q -o /dev/null --spider --no-check-certificate $APPLICATION_URL
if [ $? -eq 0 ]
then
MSG="`date` SUCCESS $APPLICATION_URL accessible!"
echo "$MSG" >> log_vulture_watch.log
else
MSG="`date` ERROR $APPLICATION_URL not accessible!"
echo "$MSG" >> log_vulture_watch.log
echo "Unable to access $APPLICATION_URL " | mail -s "Vulture_Watch Server Monitor" $MAIL_LIST
fi
2.) cd to the directory where the script file is located and make it executable. chmod 777 <scriptname>
3.) Type crontab -e and enter a line consisting of time period, and command and then save your settings. type crontab -l to list cronjobs you should see the task you just defined.
# Edit this file to introduce tasks to be run by cron.
#
# Each task to run has to be defined through a single line
# indicating with different fields when the task will be run
# and what command to run for the task
#
# To define the time you can provide concrete values for
# minute (m), hour (h), day of month (dom), month (mon),
# and day of week (dow) or use '*' in these fields (for 'any').#
# Notice that tasks will be started based on the cron's system
# daemon's notion of time and timezones.
#
# Output of the crontab jobs (including errors) is sent through
# email to the user the crontab file belongs to (unless redirected).
#
# For example, you can run a backup of all your user accounts
# at 5 a.m every week with:
# 0 5 * * 1 tar -zcf /var/backups/home.tgz /home/
#
# For more information see the manual pages of crontab(5) and cron(8)
#
# m h dom mon dow command
*/1 * * * * /home/ososapp/rscripts/vulture_watch
ososapp@ososapp:~$
You can find plenty of resources about crontab over the internet (http://unixhelp.ed.ac.uk/CGI/man-cgi?crontab+5 ), but what above line says is run the script every minute. (Please pay attention to the "/" character before the number 1 , if you don't put it your script wont run every single minute.). The last part of the script (/home/ososapp/rscripts/vulture_watch) is the path to your bash script file. (in my case vulture_watch is the script file name and it is located in directory /home/ososapp/rscripts )
4.) You are done :) enjoy.
Sunday, January 19, 2014
Raspberry Pi Fixing SSH Slow Password Prompt
I have two raspberry pis at home one is always on a web cam connected to it and it lets me view my aquarium when i want over the internet :) The other i use to experiment with various stuff ranging from reading electrical meters to trying to attach sensors to its GPIO.
Most of the time i am using ssh to login and do stuff on my raspberry pis. They are attached to my home private network and i use putty to do ssh connections to them. The user prompt appears with no delay at all. However it takes quite some time for the password prompt to appear ( taking up to 30 seconds on some occasions ). While searching ubuntu forums for another thing i came across below post about slow password prompt:
http://askubuntu.com/questions/246323/why-ssh-password-prompt-takes-too-long-to-appear
And i wanted to give it a try. I did login to raspberry pi via ssh and run below command, if you dont have vim you can use nano as well.
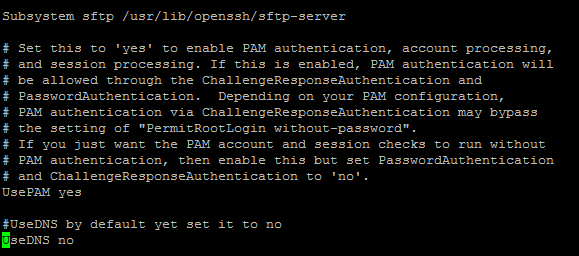
Find the line UseDNS in the sshd_config file and if it exists change it to "no". If it does not exist go to the very end of the line and add a new line "UseDNS no". When you are done save the file.
Restart ssh service using command
sudo service ssh restart
Close your ssh and re-connect this time (hopefully) you will get the password prompt instantly :).
Most of the time i am using ssh to login and do stuff on my raspberry pis. They are attached to my home private network and i use putty to do ssh connections to them. The user prompt appears with no delay at all. However it takes quite some time for the password prompt to appear ( taking up to 30 seconds on some occasions ). While searching ubuntu forums for another thing i came across below post about slow password prompt:
http://askubuntu.com/questions/246323/why-ssh-password-prompt-takes-too-long-to-appear
And i wanted to give it a try. I did login to raspberry pi via ssh and run below command, if you dont have vim you can use nano as well.
sudo vim /etc/ssh/sshd_config
Find the line UseDNS in the sshd_config file and if it exists change it to "no". If it does not exist go to the very end of the line and add a new line "UseDNS no". When you are done save the file.
Restart ssh service using command
sudo service ssh restart
Close your ssh and re-connect this time (hopefully) you will get the password prompt instantly :).
Sunday, January 12, 2014
Compiling CapWap on Ubuntu 12.04 LTS
Recently a close friend of mine wanted me to set up a development environment for a project called CapWap, never heard of it before and still not sure what it is, but taking glimpse to it's project page on github convinced me its something cool :)
You can access CapWap project page using link : https://github.com/vollero/openCAPWAP
More detail can be read from project documentation.
Below are the steps to create a development environment for CapWap
1.) Install Virtual Box to your computer. I used Virtual Box 4.3. just download it from https://www.virtualbox.org/wiki/Downloads installation requires no black magic. Clicking next next and next will do the trick.
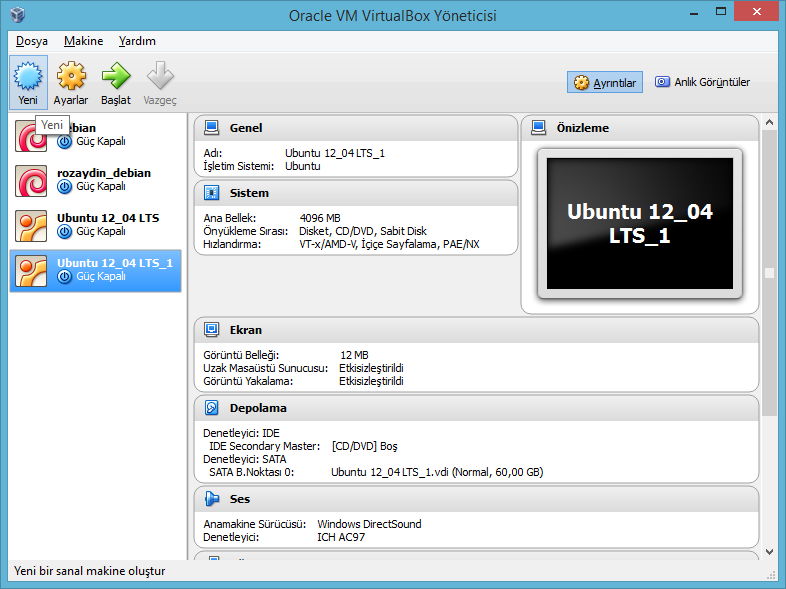
2.) Once installed run it. And create a new virtual operating system by pressing new. Below are some screenshots, in respective order, i took while creating my virtual OS. (Language is Turkish :) but should not be an issue) i allocated 4096 MB Ram, and 60 GB Hdd space. You should allocate at least 64 MB ram for graphics adapter for a comfortable desktop experience.
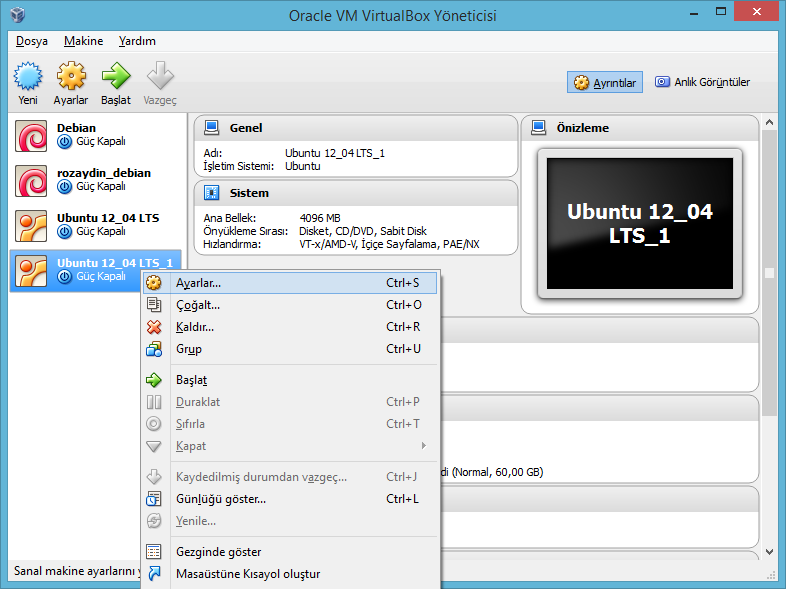
4.) Once the download is complete. open VirtualBox, select the Virtual OS from the left pane and right click on it than select setting from the popup menu. A new window will open, click on storage from left pane, and mount your freshly downloaded iso image. (screen shots below)
5.) Once iso image is mounted start your virtual operating system (go back to main screen in virtualbox select your virtual operating system from the left pane and click start) A new window will appear and ubuntu 12_04 LTS setup screen will welcome you. installation is pretty easy just go next next and follow on screen instructions its nearly impossible for you to fail. ( one thing to mention is once the installation is complete un-mount the iso image you previously mounted otherwise you will be greeted with setup screen again :) ) installation takes up some time so its a great time to waste time on the internet ...
6.) If you survived up to this point rest is a little more straight forward. i installed Netbeans as development IDE the reason is i love Netbeans :). You need to install JDK and than Netbeans follow steps below.
7.) In order to install jdk (java development kit) open terminal and type below commands in respective order select OK and Yes options when prompted. ( i followed the guide available from link: http://askubuntu.com/questions/309900/installing-java-7-update-25-on-12-04-lts works flawlessly )
8.) Once the jdk installation is complete download netbeans ide from www.netbeans.org. If you are not planning to do java development selecting C++ development version is sufficient.
When the download completes run the netbeans installer. Your installer file should be located in Downloads directory under your home directory. Installer can be invoked with sudo bash ./"netbeans-installer-name"
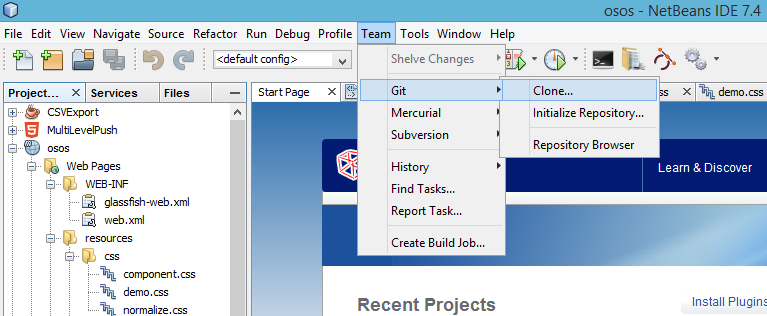
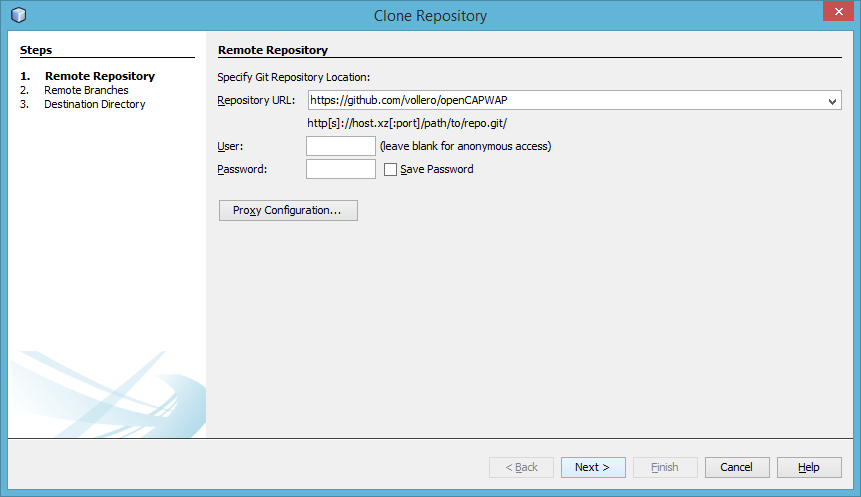
9.) Up to this point we dealt with with virtual box, ubuntu and netbeans setups from this moment on we will finally clone the CapWap repository install necessary libraries and modify makefile and we will compile in the end. Select Team->Git->Clone (Screen shot below)
type https://github.com/vollero/openCAPWAP as the repository url and click next, in next screen just click next and finish.
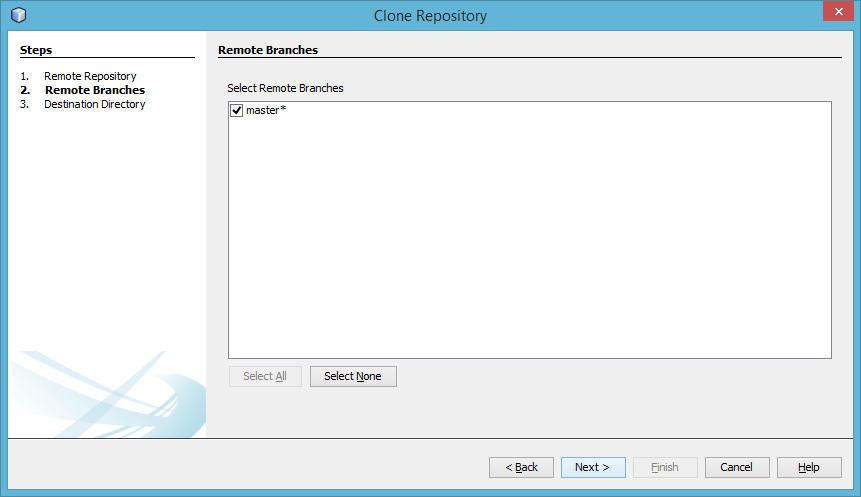
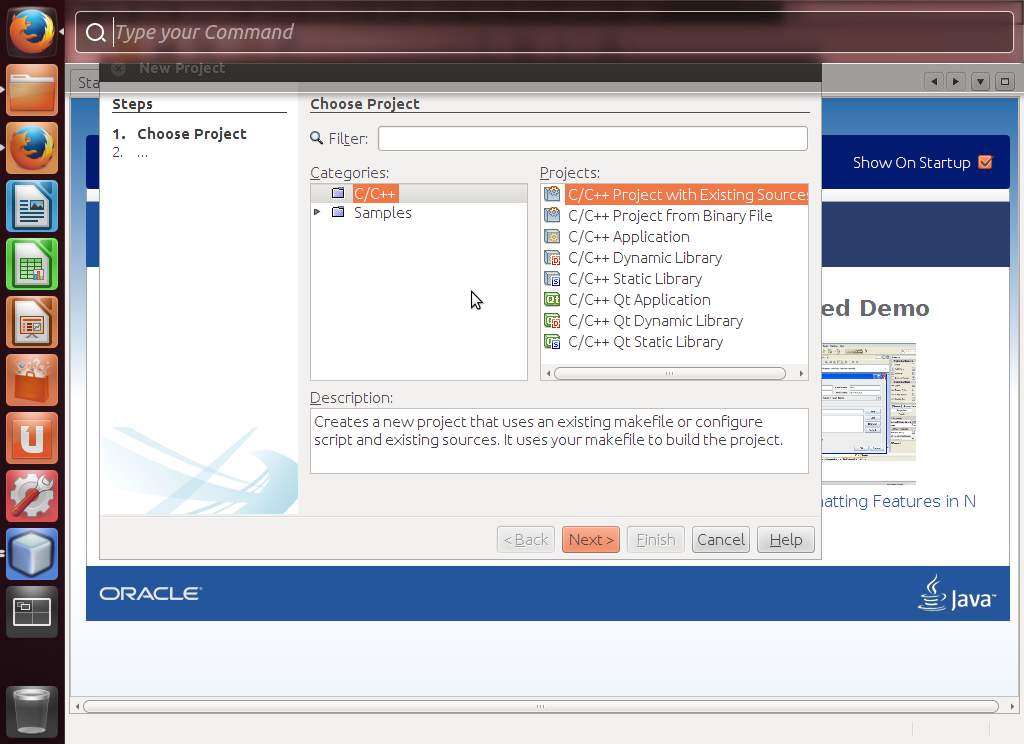
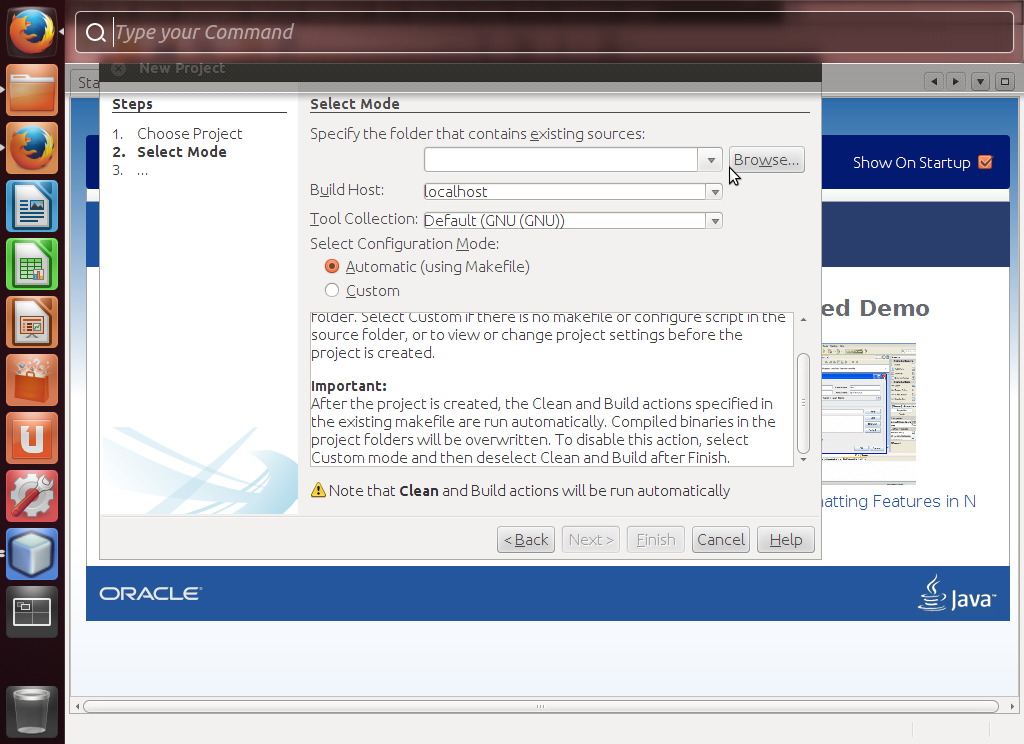
Once the clone opration complete the ide will show a dialog "Do you want to create an IDE project from cloned resources?" click Create Project. Follow the screen shots for next steps.
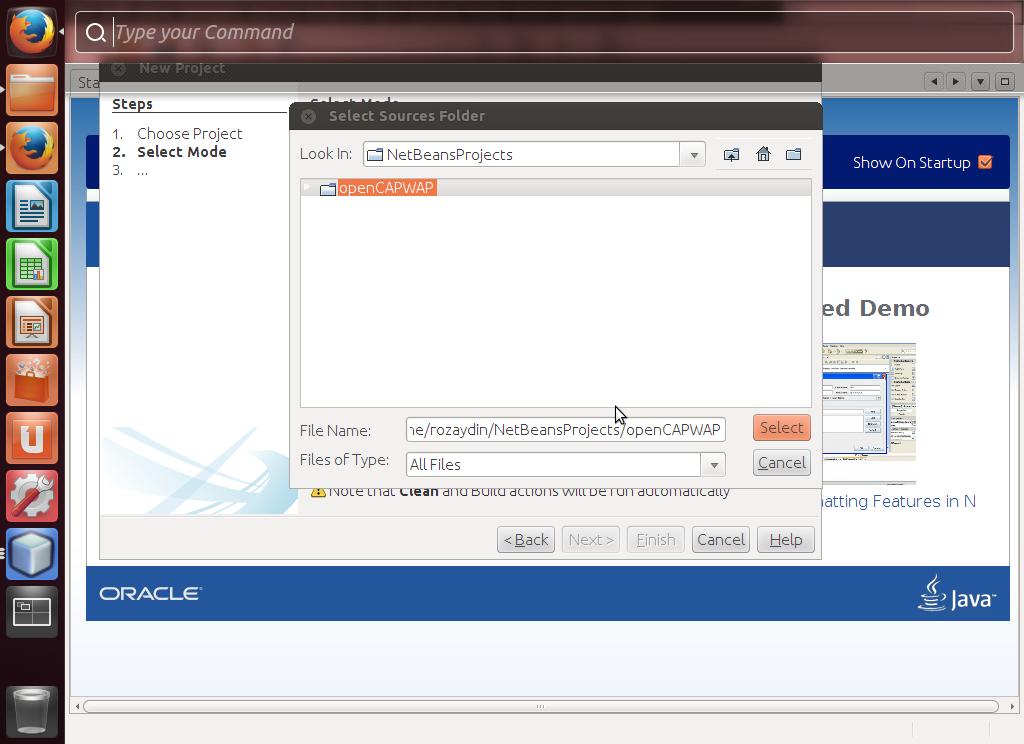

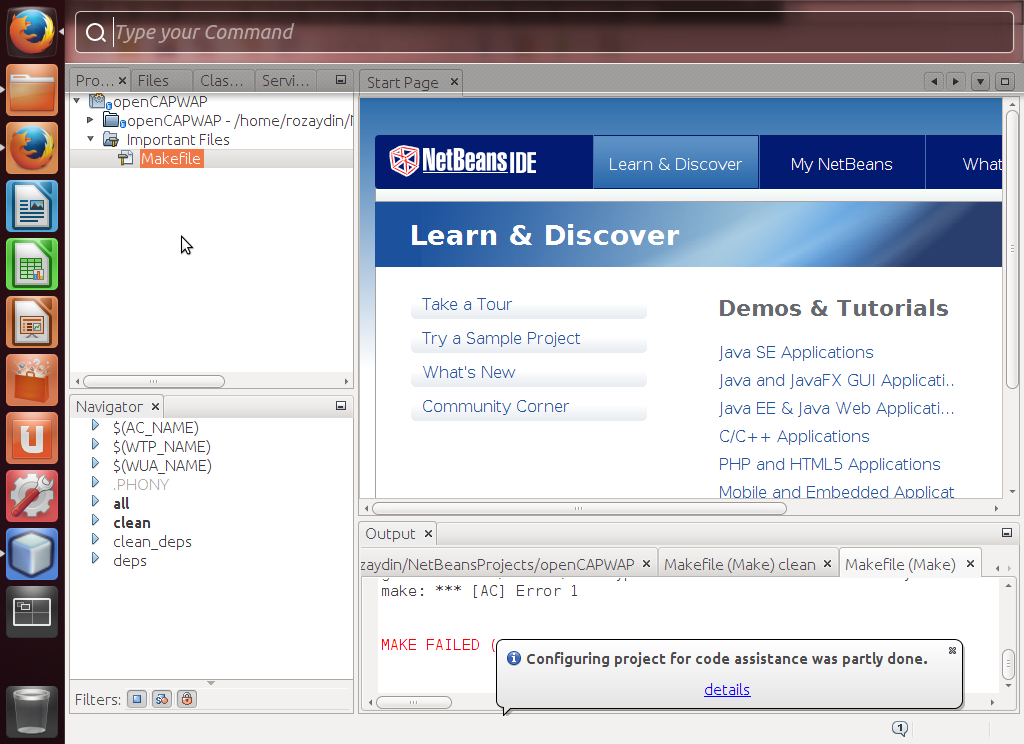
Well if you followed properly you should be seeing the project in the ide right now, congrats only a few more steps left to make it compile properly.
To make CapWap compile you need to install libpcap-dev, libssl-dev libraries and you need to tweak a few lines in the make file.
Open the terminal and type below commands respectively
then open Netbeans and double click MakeFile (under important Files) Find the line that starts with LDFLAGS and change it as below:
Well thats it. Save MakeFile and press clean build from the top, it should compile with no errors and you are ready to go.
I hope someone finds this article useful, feel free to leave your comments below.
You can access CapWap project page using link : https://github.com/vollero/openCAPWAP
More detail can be read from project documentation.
Below are the steps to create a development environment for CapWap
1.) Install Virtual Box to your computer. I used Virtual Box 4.3. just download it from https://www.virtualbox.org/wiki/Downloads installation requires no black magic. Clicking next next and next will do the trick.
2.) Once installed run it. And create a new virtual operating system by pressing new. Below are some screenshots, in respective order, i took while creating my virtual OS. (Language is Turkish :) but should not be an issue) i allocated 4096 MB Ram, and 60 GB Hdd space. You should allocate at least 64 MB ram for graphics adapter for a comfortable desktop experience.
3.) Once you are done go to Ubuntu web site and download 32 Bit Ubuntu 12_04 LTS Desktop Edition
do not go for 64 bit version even if you have an 64 bit system.You can download ubuntu from this link: http://www.ubuntu.com/download/desktop
4.) Once the download is complete. open VirtualBox, select the Virtual OS from the left pane and right click on it than select setting from the popup menu. A new window will open, click on storage from left pane, and mount your freshly downloaded iso image. (screen shots below)
5.) Once iso image is mounted start your virtual operating system (go back to main screen in virtualbox select your virtual operating system from the left pane and click start) A new window will appear and ubuntu 12_04 LTS setup screen will welcome you. installation is pretty easy just go next next and follow on screen instructions its nearly impossible for you to fail. ( one thing to mention is once the installation is complete un-mount the iso image you previously mounted otherwise you will be greeted with setup screen again :) ) installation takes up some time so its a great time to waste time on the internet ...
6.) If you survived up to this point rest is a little more straight forward. i installed Netbeans as development IDE the reason is i love Netbeans :). You need to install JDK and than Netbeans follow steps below.
7.) In order to install jdk (java development kit) open terminal and type below commands in respective order select OK and Yes options when prompted. ( i followed the guide available from link: http://askubuntu.com/questions/309900/installing-java-7-update-25-on-12-04-lts works flawlessly )
sudo add-apt-repository ppa:webupd8team/java
sudo apt-get update
sudo apt-get install oracle-java7-installer
java -version
8.) Once the jdk installation is complete download netbeans ide from www.netbeans.org. If you are not planning to do java development selecting C++ development version is sufficient.
When the download completes run the netbeans installer. Your installer file should be located in Downloads directory under your home directory. Installer can be invoked with sudo bash ./"netbeans-installer-name"
cd ~/Downloads
sudo bash ./netbeans-7.4-cpp-linux.sh
installation is pretty straightforward and for c++ development netbeans requires around 210 mb of space. Netbeans will automatically detect required configuration just do next next and next. Once the installation is complete fire up netbeans. ( Click on dash home button from the left pane on desktop type netbeans to the search bar and click on it)
9.) Up to this point we dealt with with virtual box, ubuntu and netbeans setups from this moment on we will finally clone the CapWap repository install necessary libraries and modify makefile and we will compile in the end. Select Team->Git->Clone (Screen shot below)
type https://github.com/vollero/openCAPWAP as the repository url and click next, in next screen just click next and finish.

Once the clone opration complete the ide will show a dialog "Do you want to create an IDE project from cloned resources?" click Create Project. Follow the screen shots for next steps.


To make CapWap compile you need to install libpcap-dev, libssl-dev libraries and you need to tweak a few lines in the make file.
Open the terminal and type below commands respectively
sudo apt-get install libpcap-devsudo apt-get install libssl-devthen open Netbeans and double click MakeFile (under important Files) Find the line that starts with LDFLAGS and change it as below:
LDFLAGS = /usr/lib/i386-linux-gnu/libz.a /usr/lib/i386-linux-gnu/libssl.a /usr/lib/i386-linux-gnu/libcrypto.a -lpthread -ldl -lz -D_REENTRANT
I hope someone finds this article useful, feel free to leave your comments below.
Subscribe to:
Posts (Atom)

